This is part of the TechEd section.
As previously mentioned, to diversify my techie skills (and its fun), I have a little side home DIY project on the go to achieve the following:
- Create a RS485 network, to allow me to easily connect together multiple Arduino’s over a distributed network.
- Gateway said RS485 network onto the Ethernet network in the house
- Get measurements for temperature and humidity for various locations in the house
- Take over ‘executive control’ of the irrigation system.
Well stage 1 is in and working. What was previously worked out has been installed and is running. At the moment I have three DHT11’s (2 under the house, 1 in the roof) measuring away every 10 minutes and getting recorded into a MySQL database.
I want to share with you some learns I had on the way…
DHT11 Pull-up – is it strong enough?
In order for the one wire protocol with the DHT11 to work, the line needs to be pulled up to a known state, so the Arduino and DHT11 can start a protocol ‘dance’ to send back the required information in a data packet. Now over short runs, the pull up resistor (when using the DHT11 library that turns on the internal pull up) its usually strong enough to drive that pull-up all the way to the DHT11 on the other end.
Now, if you have a long run of cable, say getting on for 30 meters like I have – that pull-up might not be quite consistently strong enough to do the job – in effect you either get a total failure in reading, or bad data. I was right on the edge of the ‘digital cliff’, it would work sometimes, other times not.
I did some reading around and found out that the pull-up resistor built in is not a known or consistent value – it varies from micro-controller to micro-controller obviously. So I got thinking, maybe the library was written with the assumption of a given micro-controller and therefore might not work in the way intended. So I had to find out the true value of the pull-up resistor inside the controller. I did the following:
- Loaded up my program to the Arduino Clone, that would run and take over pin 7 and enable the pull up.
- Got a multi meter and measured the current flowing between pin 7 and Ground – turned out to be around 0.13 mA (milliAmp).
- Used the multi meter to measure the supply voltage 4.98v
- Then by doing V/I = R I got a pull resistance value of around 38k
38k is not the 5k mentioned in the datasheets… So a bit of resistor in parallel maths told me that a 10k to 14k resistor across the data pin to 5v would improve things somewhat.
So I went under the house a few days ago and put in the resistors…
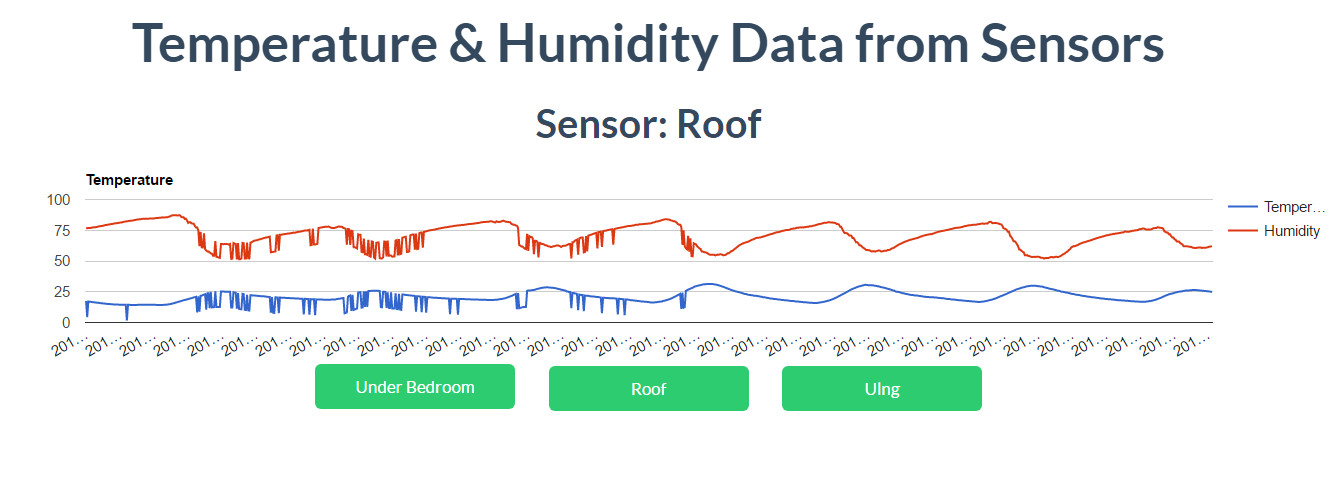
I think it did the trick – the data has now cleared up. BTW my eldest son did the coding for that graph using Google Charts – minimal help from me!
Getting control of the irrigation controller
The controller I use operates off 24v AC which is switched to the various solenoids around the property that control water flow. Now I needed to make sure that I was putting in the override relays on the right ‘side’ of the AC supply, so I didn’t short out the controller when the Arduino relays were fired. Basically you need to have your controller disconnected from its transformer, then using a multi meter in ‘short detect’ mode (or resistance mode) probe from the common terminal to both of the AC in connectors, one of them should be a short – that’s the one you DO NOT connect to for your relay switching, otherwise not a lot will happen or you might burn out the fuse…
Remember the goal is have the relay in parallel with the action of the irrigation controller which switches on the ‘high’ side, not the low ‘common’ side.
Something I did was also wire the common via a relay that was Normally Closed – this way later on I can add in a rain sensor (or weather feed) and turn off the irrigation safe in the knowledge that it will or is currently raining…
Future Plans
I have a rather fancy rain sensor in the post – I will wire that in when it arrives. Plus look to tie in the BOM weather feed to get some heuristic based irrigation control in place.